You will only need to refer to these instructions once!
Remove the surrounding support
Place the printed side down on a hard flat surface.
Then place your thumb down on the cooler next to each join and lift the outer support at that point.
Repeat this for all joins.


Get the best outcome with a smooth & rounded outer surface
Be sure that ALL of the inside creases are folded, one at a time, to at least 60 degrees or until you feel the corrugations give way, then released.
Fold every crease/score from each end to the centre
At this stage the assembly process will look like this.

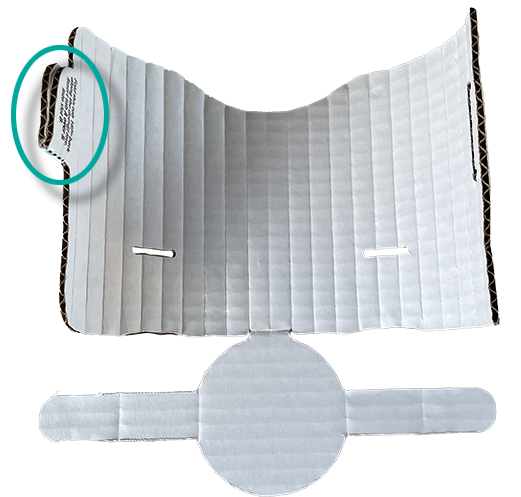
Preparing Tab A
Fold Tab A back on itself & hold in position.
Then squeeze, compress its leading edges to assist the tab entering Slot B.
Locking Tab A into Slot B
Push the folded Tab A all the way into Slot B.
This will lock it into position.
The folded Tab A can be released from inside the cylindrical form.

Preparing the base wings
Fold up the wings attached to the base, at the score, to 90 degrees then release.
There are 2 scores on each wing. Fold the score closest to their ends to 180 degrees, then release.
Squeeze, compress the ends of each wing to assist in their entry into the cylindrical form.

You’re almost there
Place the cylinder upright so the base sits within it & slot each wing into the slots provided on each side of the cooler.
Remember to squeeze the ends of the wings

Your check list
Tab A has been folded back down.
The wings are positioned up close to the side of the cooler. ie. they are all the way in.
When viewing the wings from above - they should be horizontal to the base making it easy for the can or bottle to be pushed down to the base.

1 last thing
Hold the wings up against the outside of the cooler.
This ensures that when you push your can or bottle into the cooler, you end up with the wings remaining tight against the sides.
Done once, the Coolcardie is ready to party!

Enjoy!
